
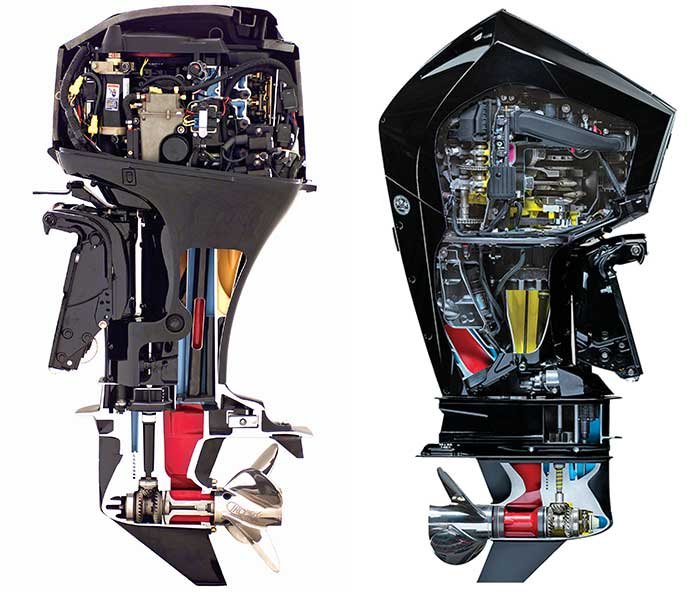
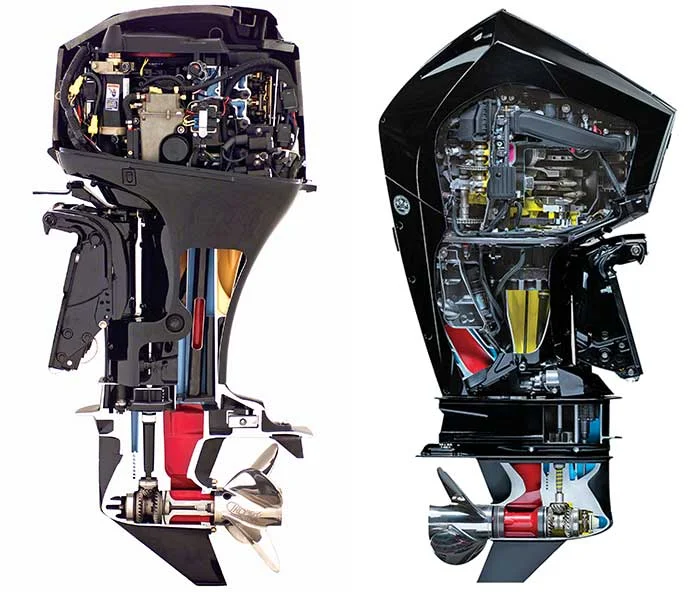
Boat Motor Installation Service: The Complete Guide to Doing It Right (2026)

Boat Motor Installation Service: What Correct Installation Actually Involves

A brand-new outboard bolted on wrong performs like a tired old one, and a tired old one bolted on right often outruns a new engine that was rigged in an afternoon by someone rushing to get the boat back in the water. That’s the part people miss when they’re shopping for a motor and treating installation as an afterthought. A proper boat motor installation service is the difference between an engine that runs at its rated performance for the next decade and one that fights the transom, the rigging, and its own propeller for its entire service life.
We sell complete outboards across most major brands, and we treat installation as part of the sale, not a separate errand the customer figures out afterward. Getting mounting height, rigging, and initial break-in right at the start prevents the majority of the “my new engine doesn’t feel right” complaints we hear about motors that were installed elsewhere.
Transom height and shaft length: the measurement a boat motor installation service can’t skip
Every outboard is built in a specific shaft length to match a range of transom heights, and getting this wrong is the single most common installation mistake. Mount an engine too high and the propeller ventilates, pulling air down along the leg and losing bite, especially in turns or rough water. Mount it too low and you add drag, increase fuel consumption, and put unnecessary stress on the lower unit. The anti-ventilation plate, the flat horizontal surface just above the propeller, should sit roughly level with the bottom of the hull, adjusted slightly up or down based on hull design and how the boat is actually going to be run.
| Shaft Length Designation | Approx. Length | Typical Transom Height |
|---|---|---|
| Short (S) | 15 in / 381 mm | 15 in transom, common on smaller tenders and jon boats |
| Long (L) | 20 in / 508 mm | 20 in transom, the most common configuration on recreational boats |
| Extra Long (XL/X) | 25 in / 635 mm | 25 in transom, common on offshore and larger center consoles |
| Ultra Long (UL/U) | 30–35 in / 762–889 mm | Heavy offshore boats and high-transom applications |
Buying the wrong shaft length is a mistake that no amount of good rigging afterward can fully correct. It’s the first thing we confirm on any boat motor installation service we handle, using the actual transom measurement rather than the boat’s listed specification, since aftermarket jack plates, hull modifications, and prior repairs can all change the real number from what a spec sheet says.
Mounting bolts, torque specs, and why over-tightening is its own failure mode
Outboards mount through a combination of clamp brackets or bolted transom brackets depending on size, and every fastener in that chain has a specified torque value for a reason. Under-torqued mounting bolts work loose under vibration, and a loose engine mount doesn’t just rattle, it accelerates wear on the mounting bracket itself and can eventually lead to a genuinely dangerous failure at speed. Over-torqued bolts crack aluminum transom brackets or strip threads, which turns a five-minute mounting job into a repair. Stainless mounting hardware, properly torqued and checked again after the first several hours of break-in running (fasteners settle slightly as materials seat), is standard on every installation we do.
Rigging: controls, cables, and the wiring every boat motor installation service must get right
Rigging covers everything that connects the engine to the helm: throttle and shift cables, the wiring harness for engine monitoring and ignition, the fuel line and primer bulb, and on larger installations, power steering hydraulics or hydraulic steering lines. Cable routing matters more than it looks like it should. A throttle or shift cable routed with too tight a bend binds over time and develops stiff spots that make shifting feel notchy or delayed, which owners often mistake for a mechanical problem in the lower unit when it’s actually a rigging issue that a shop chose not to fix properly at install.
Correct rigging also means matching cable length precisely rather than coiling excess cable somewhere out of sight, which is a shortcut that shows up later as premature cable wear or binding. A proper boat motor installation service measures and cuts to the correct length for the specific boat, not a generic length that happens to reach.
Propeller selection is part of installation, not an afterthought
An engine can be mounted perfectly and still underperform if it’s turning the wrong propeller. Prop pitch and diameter need to be matched to the boat’s weight, hull design, and intended use, and the only way to confirm the match is correct is a wide-open-throttle RPM test after installation. If the engine can’t reach the manufacturer’s rated WOT RPM range with the boat loaded for normal use, the prop is too much load, usually meaning the pitch needs to come down.
If it spins past the top of the rated range, the prop is too little load and pitch needs to go up. Guessing at a propeller and calling the installation finished skips a step that materially affects both performance and engine longevity, since an engine running outside its rated RPM range under load wears faster than one operating where it was designed to.
| HP Range | Typical WOT RPM Range | Common Prop Adjustment If Outside Range |
|---|---|---|
| Under 20 HP | 5,000–6,000 RPM | Smaller pitch changes, often 1 inch increments |
| 25–90 HP | 5,000–6,000 RPM | Pitch changes in 1–2 inch increments depending on load |
| 115–300 HP | 5,000–6,000 RPM | Diameter and pitch both considered for heavier hulls |
| 350 HP and up | 5,000–6,000 RPM (model dependent) | Often multiple prop options tested for the specific hull |
Break-in procedure: the first hours set the tone for everything after
A new or freshly rebuilt engine needs a specific break-in schedule, typically a period of varied RPM avoiding sustained wide-open throttle for the first several hours, to let piston rings seat properly against the cylinder walls. Skipping or rushing break-in doesn’t always cause an immediate problem, but it commonly shows up later as slightly higher oil consumption or reduced compression than the engine should have at low hours. Every engine we install comes with the manufacturer’s specific break-in schedule, and we walk through it with the owner rather than assuming they’ll find the fine print in the manual themselves.
Common boat motor installation service mistakes that shorten an engine’s life
Mounting height guessed instead of measured. Cables routed with sharp bends because it was faster than doing it properly. A propeller left at whatever came bolted to a demo engine instead of matched to the actual boat and load. Ground wires attached to painted surfaces instead of clean bare metal, which causes intermittent electrical gremlins that take far longer to diagnose than they would have taken to install correctly. And skipping the WOT RPM verification entirely, which means nobody actually confirmed the engine and prop are working together the way they’re supposed to. Any decent boat motor installation service catches all of these before the boat ever leaves the shop.
Fuel system integration and the ethanol problem installers need to plan for
Ethanol-blended fuel is now standard in most markets, and it’s more aggressive on rubber and certain plastics than the fuel systems on older boats were designed for. Part of a correct installation on any boat with existing fuel lines is inspecting those lines for ethanol compatibility rather than assuming they’re fine because they look intact. A fuel line that degrades internally can shed material that clogs a brand-new engine’s injectors within the first season, which gets blamed on the engine when the actual cause was upstream fuel system components that should have been flagged at install.
Engines ready for professional installation
Every motor we sell can be paired with full installation, rigging, and break-in support, either at our shop or coordinated with a qualified installer at your location if you’re taking delivery elsewhere. A sample of what’s currently in stock across shaft lengths and horsepower ranges:
| Motor | HP | Shaft | Approx. Price (USD) |
|---|---|---|---|
| Yamaha T9.9XWHB | 9.9 HP | Extra Long (25″) | $1,980 |
| Yamaha F50LB | 50 HP | Long (20″) | $4,240 |
| Yamaha F60JB | 60 HP | Long (20″) | $5,180 |
| Yamaha F70LA | 70 HP | Long (20″) | $5,145 |
| Yamaha F90XB | 90 HP | Long (20″) | $5,130 |
| Yamaha LXF425ESA V8 | 425 HP | Ultra Long (35″) | $24,800 |
Compare full lineups by brand: Mercury outboards, Suzuki outboards, Honda outboards, and Evinrude outboards are all in stock in a range of shaft lengths.
Single engine versus twin or triple installations: how a boat motor installation service scales
Multi-engine installations add a layer of complexity beyond mounting a single motor: engine spacing needs to account for steering clearance at full lock, cable and wiring harnesses multiply and need to be routed without crossing or chafing against each other, and synchronization between engines, whether mechanical or handled electronically, needs to be verified after installation rather than assumed. A boat motor installation service handling a twin or triple setup should be confirming that both or all engines reach the same WOT RPM within a tight tolerance of each other under equal load, since a mismatch usually points back to a propeller or rigging difference between the two sides rather than anything wrong with either engine individually.
Steering integration: mechanical cable versus hydraulic
Smaller and mid-range outboards typically run on mechanical cable steering, where a rotary or rack-style helm turns the engine directly through a steering cable. Once you get into higher horsepower ranges, or any twin-engine setup, hydraulic steering becomes the standard because it removes the physical effort of turning a heavier engine at low speed and gives smoother feel at the helm. Installing hydraulic steering correctly means bleeding the system fully to remove air from the lines, since trapped air shows up as a spongy, inconsistent feel at the wheel that owners often mistake for a worn helm pump when it’s actually a bleeding issue from an installation that was rushed.
A proper boat motor installation service bleeds hydraulic steering the same way a mechanic bleeds automotive brakes, methodically and checked twice, not once and called done.
Corrosion protection starts with the boat motor installation service, not afterward
Sacrificial anodes, the zinc, aluminum, or magnesium blocks that corrode intentionally to protect the engine’s more expensive metal components, need to be checked and correctly bonded at installation, not added as an afterthought once corrosion has already started somewhere. Anode material matters by water type: zinc anodes are standard for saltwater, aluminum anodes work across both salt and brackish water, and magnesium is used in freshwater-only applications where zinc doesn’t corrode fast enough to do its job.
Installing the wrong anode material for the water an engine actually operates in is a quiet mistake that shows up eighteen months later as corrosion on parts that should have been protected the whole time. This gets confirmed as part of every installation we handle, matched to where the boat is actually going to be used rather than a generic default.
What a boat motor installation service typically costs and what drives the price
Pricing varies by engine size, whether existing rigging can be reused or needs full replacement, and whether the job is a straightforward repower or a first-time installation on a boat that’s never had power steering or a digital gauge network before. A simple swap onto existing, compatible rigging is the least expensive scenario. A full repower that includes new controls, a new wiring harness, hydraulic steering conversion, and a fresh propeller selection process costs meaningfully more, but it also produces a result that performs and holds up like a new installation should, rather than one held together with whatever the old boat happened to already have.
We provide a clear breakdown before starting so there are no surprises between the quote and the final invoice.
The sea trial: the last step of any boat motor installation service nobody should skip
Once mounting, rigging, and propeller selection are done, the engine still needs a real sea trial before the job is considered finished. That means running at idle, cruise, and wide-open throttle with the boat loaded the way it’ll normally be used, checking for consistent water flow at the telltale, confirming steering doesn’t bind at full lock in either direction, verifying shift engagement is clean going forward and reverse repeatedly, and watching gauge readings against expected values the whole time.
A sea trial done for five minutes at idle in a calm marina doesn’t reveal much. A proper trial that includes time at cruising RPM and at least one run to wide-open throttle is what actually confirms a boat motor installation service did its job completely, rather than just getting the boat to start and idle in the shop.
What documentation you should walk away with
A professional installation should leave you with more than a running engine. That includes the recorded WOT RPM test results with the actual propeller installed, torque specs confirmed on mounting hardware, the break-in schedule specific to your engine, and a note of exactly which propeller pitch and diameter was installed, since that’s the reference point for any future prop change. We provide this documentation with every installation, and it’s the same information we’d want if we were buying an engine somewhere else and trying to verify the work was actually done correctly.
Regional shipping and installation coordination
We ship engines worldwide and coordinate installation either in-house or with vetted installers depending on where the boat is located. Import logistics, local rigging part availability, and regional fuel quality (ethanol content varies significantly by country) all factor into how we plan an installation for a customer outside our immediate service area, and we walk through those details before the engine ships rather than leaving it for the customer to sort out on delivery day.
Installation choices that pay off when a boat sits idle for months
Not every boat runs year-round, and a boat motor installation service that only thinks about the day the engine goes in is missing half the job. Engines that face a long lay-up, whether that’s a genuine winter freeze somewhere up north or just a rainy season where the boat sits under a cover for months, need a few installation details handled with that downtime in mind. Fuel line routing that allows a full stabilized-fuel fill without trapping air pockets, a lower unit drain plug that’s actually accessible without pulling half the rigging apart, and battery cable connections that are protected enough to survive months of humidity without corroding at the terminal all get decided at install time, not scrambled together the first time a customer asks about storage.
Freeze risk is the sharpest version of this problem. A lower unit or cooling passage that still holds water when temperatures drop below freezing can crack a housing or block a passage, and that damage is invisible until the engine gets its first hard run of the new season, at which point it looks like a mystery overheating problem rather than what it actually is: water that never got drained the previous fall. An installation done with lay-up in mind makes sure the drain and fill plugs are positioned somewhere a person will actually bother to use them, rather than tucked behind rigging that has to be partially disassembled first.
This matters just as much for engines heading to warmer climates that never see a freeze, just in a different way. Extended idle time in hot, humid conditions is harder on rubber fuel lines, fogging oil coverage, and battery health than most owners expect, and a proper installation accounts for that by making the parts that need periodic attention during a layup easy to reach rather than an afterthought. Wherever an engine ends up, the installation itself should make the boring maintenance during an idle season simple enough that it actually gets done.
Frequently asked questions
How long does a typical boat motor installation service take?
A straightforward single-engine repower on a boat with existing rigging in reasonable condition usually takes one to two days including the WOT test run. Multi-engine or full rigging replacement jobs take longer.
Can I handle a boat motor installation service myself if I’m mechanically inclined?
Mounting the engine itself isn’t complicated, but getting shaft length, torque specs, and propeller matching correct requires more precision than it looks like from the outside. A rushed self-install is where most of the problems we see later actually started.
Do you install engines you didn’t sell?
Yes, we handle installation and rigging work on engines purchased elsewhere as long as the motor and boat are compatible.
What’s included in a WOT RPM test?
Running the boat at wide-open throttle under a normal operating load (fuel, passengers, gear roughly as it would be used) and confirming the engine reaches the manufacturer’s rated RPM range, adjusting propeller pitch if it doesn’t.
Does installation affect my engine’s warranty?
Improper installation can void warranty coverage on issues it directly causes, which is exactly why documented, correct installation matters. We provide records specifically to protect that coverage.
How do I know if my current engine received a proper boat motor installation service?
Signs of a poor install include a propeller that never got properly matched (engine doesn’t reach rated WOT RPM), stiff or notchy shifting, or visible corrosion at ground points. We can evaluate an existing installation and correct what’s off.
Do I need hydraulic steering for a mid-range engine, or is cable steering enough?
For most engines under roughly 150 HP on a single-engine boat, mechanical cable steering performs fine and costs less to install and maintain. Hydraulic steering becomes worth the added cost on larger single engines, twin-engine setups, or any boat where low-speed steering effort has become genuinely tiring.
What anode material does my boat actually need?
It depends entirely on the water you run in: zinc for saltwater, aluminum if you split time between salt and brackish water, magnesium for freshwater only. Using the wrong material either wastes the anode’s protective capacity or fails to protect the engine adequately.
The bottom line
A correct boat motor installation service covers shaft length matched to the actual transom, properly torqued mounting hardware, cleanly routed rigging, a propeller confirmed against WOT RPM spec, and a documented break-in schedule, not just an engine bolted on and a customer sent on their way. Every motor we sell can be paired with full installation support, and we handle installation on outside-purchased engines too. Browse our current inventory or get in touch with your boat’s transom height and intended use and we’ll help you land on the right engine and shaft length before anything ships.
For what happens after installation, see our guide to outboard motor servicing, and if you’re comparing options across brands, check our current marine engine discounts. The American Boat and Yacht Council publishes the technical standards most of this installation guidance is built around, and the U.S. Coast Guard boating safety program is worth a look too if you want the broader safety picture beyond just the engine.
Posts Widget
- 1

- 2

- 3
- 4


S.H Continental Marine
USA HERALD MAGAZINE INC
Our team is dedicated to providing exceptional customer service.
Email: info@shcontinentalmarine.com
Choose S.H Continental Marine
for your outboard engine needs and enjoy superior quality, exceptional customer service, and unbeatable prices.
